WireGuard Tunnel: Connecting a Raspberry Pi to Google Cloud
Set up a persistent VPN tunnel between a Raspberry Pi behind NAT and a GCE VM. Foundation for distributed homelab systems.

SERIES
Distributed Browser Automation
Tailscale seemed like the obvious choice. Install on both machines, authenticate, done. The marketing promised exactly what I needed: my Raspberry Pi at home talking to a GCE VM in the cloud.
It worked for three days. Then the connection started dropping. Sometimes it would reconnect. Sometimes it wouldn’t. The Pi showed “connected” while the VM couldn’t reach it. Debugging meant reading through Tailscale’s coordination server logs, wondering if the issue was their infrastructure or mine.
I spent an afternoon on this before switching to WireGuard. Ten lines of config on each machine. No external servers. No authentication flows. It’s been running for weeks without a single drop.
The Problem
You have a Raspberry Pi behind your home router’s NAT. You have a GCE VM with a public IP. You want bidirectional communication - the VM should be able to initiate connections to the Pi, not just receive them.
The challenge: NAT hides the Pi. The GCE VM can’t reach it directly. You need a persistent tunnel where the Pi initiates, but both sides can talk.
Why WireGuard
- ~10 lines of config per machine - no complex setup
- No external dependencies - runs entirely on your infrastructure
- NAT-friendly - PersistentKeepalive keeps the tunnel alive
- Kernel-level performance - minimal overhead
The Architecture
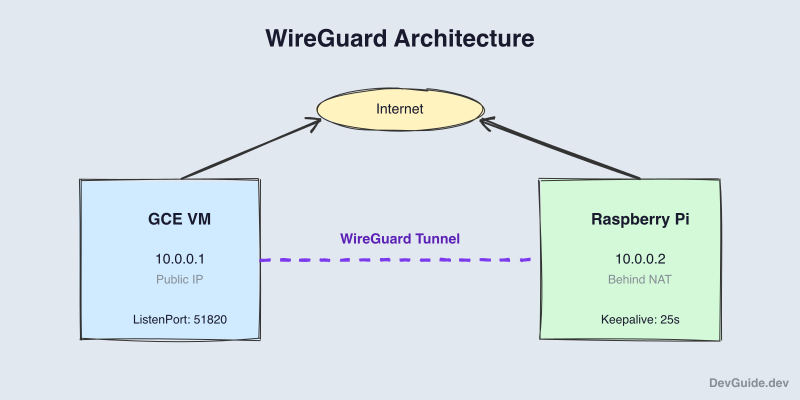
The key insight: the Pi initiates the connection. It knows the GCE public IP and can reach it. The GCE VM doesn’t need to know where the Pi is - WireGuard remembers where packets came from.
PersistentKeepalive sends a packet every 25 seconds to keep the NAT mapping alive. Without it, the router forgets the mapping and the GCE VM can no longer reach the Pi.
Prerequisites
- Google Cloud account with a project and billing enabled
gcloudCLI installed and configured- Raspberry Pi 5 with Raspberry Pi OS (64-bit)
Hardware
For the full distributed browser automation system (covered in later posts), here’s what I’m using:
| Item | Purpose | Link |
|---|---|---|
| Raspberry Pi 5 8GB | Main compute | Amazon.in |
| Raspberry Pi 27W USB-C Power Supply | Pi power | Amazon.in |
| Raspberry Pi 5 Official Case | Protection | Amazon.in |
| SanDisk 128GB microSD | OS storage | Amazon.in |
| TP-Link 7-Port USB 3.0 Hub | Connect multiple dongles | Amazon.in |
| Amazon Basics LTE Dongle | Mobile connectivity | Amazon.in |
| Portronics Mport 31 Plus | SD card reader for flashing | Amazon.in |
| APC UPS 600VA | Power backup | Amazon.in |
For just the WireGuard tunnel in this post, you only need the Pi, power supply, and SD card. The USB hub and LTE dongles come into play when we set up multi-dongle networking.
Step 1: Create the GCE VM
If you don’t have a Google Cloud project yet, create one:
gcloud projects create wireguard-tunnel --name="WireGuard Tunnel"
gcloud config set project wireguard-tunnel
Enable billing for the project in the Google Cloud Console, then enable the Compute Engine API:
gcloud services enable compute.googleapis.comStart by reserving a static IP. Ephemeral IPs change when you stop and start the VM, which would break the Pi’s Endpoint config and require manual updates every time.
gcloud compute addresses create wireguard-ip \
    --region=asia-south1
View the reserved IP - you’ll need this later for the Pi’s configuration:
gcloud compute addresses describe wireguard-ip \
    --region=asia-south1 \
    --format='get(address)'
Create the VM with the static IP attached:
gcloud compute instances create wireguard-server \
    --zone=asia-south1-a \
    --machine-type=e2-micro \
    --image-family=debian-12 \
    --image-project=debian-cloud \
    --address=wireguard-ip \
    --tags=wireguard
The e2-micro instance is free-tier eligible and more than enough for WireGuard - it’s just encrypting and forwarding packets.
Open the firewall for WireGuard traffic:
gcloud compute firewall-rules create allow-wireguard \
    --direction=INGRESS \
    --priority=1000 \
    --network=default \
    --action=ALLOW \
    --rules=udp:51820 \
    --source-ranges=0.0.0.0/0 \
    --target-tags=wireguard
SSH into the VM to continue setup:
gcloud compute ssh wireguard-server --zone=asia-south1-aStep 2: Configure WireGuard on the GCE VM
Install WireGuard:
sudo apt update && sudo apt install -y wireguardGenerate keys. WireGuard uses public-key cryptography - each machine gets a keypair, and they exchange public keys to authenticate.
sudo su
cd /etc/wireguard
umask 077
wg genkey | tee privatekey | wg pubkey > publickey
The umask 077 ensures new files are only readable by root. View the public key - you’ll need this for the Pi’s configuration:
cat publickeyCreate the server configuration at /etc/wireguard/wg0.conf:
[Interface]
Address = 10.0.0.1/24
ListenPort = 51820
PrivateKey = <contents of privatekey>

[Peer]
# Raspberry Pi
PublicKey = <Pi's public key - from Step 3>
AllowedIPs = 10.0.0.2/32
Leave the Pi’s public key blank for now - you’ll add it after setting up the Pi.
Step 3: Configure WireGuard on the Raspberry Pi
SSH into your Pi and install WireGuard:
sudo apt update && sudo apt install -y wireguardGenerate keys the same way:
sudo su
cd /etc/wireguard
umask 077
wg genkey | tee privatekey | wg pubkey > publickey
View the public key - you’ll add this to the GCE config:
cat publickeyCreate the client configuration at /etc/wireguard/wg0.conf:
[Interface]
Address = 10.0.0.2/24
PrivateKey = <contents of privatekey>

[Peer]
# GCE VM
PublicKey = <GCE's public key from Step 2>
Endpoint = <GCE static IP from Step 1>:51820
AllowedIPs = 10.0.0.1/32
PersistentKeepalive = 25
The Pi’s config has two settings the GCE config doesn’t need:
Endpoint tells the Pi where to find the GCE VM. The GCE VM doesn’t need an Endpoint because the Pi initiates - WireGuard learns the Pi’s address from incoming packets.
PersistentKeepalive = 25 sends a packet every 25 seconds. Without this, the router’s NAT mapping expires and the GCE VM can no longer reach the Pi.
Step 4: Exchange Keys and Connect

Go back to the GCE VM and add the Pi’s public key to the config:
sudo nano /etc/wireguard/wg0.conf
# Add the Pi's public key to the [Peer] section
Start WireGuard on the GCE VM first:
sudo wg-quick up wg0Then start it on the Pi:
sudo wg-quick up wg0Step 5: Verify the Connection
Check the tunnel status on either machine:
sudo wg showYou should see latest handshake with a recent timestamp - this confirms the tunnel is working.
Test connectivity from both directions:
# From Pi
ping 10.0.0.1

# From GCE
ping 10.0.0.2
Both should work. The GCE VM can now reach the Pi even though it’s behind NAT.
Step 6: Enable on Boot
Run this on both machines to start WireGuard automatically:
sudo systemctl enable wg-quick@wg0wg-quick is a helper script that reads the config file and sets up the interface, routes, and addresses. The interface name wg0 comes from the config filename.
Making It Resilient
Even with WireGuard’s reliability, network conditions can cause temporary disconnects. Add a health check on the Pi that automatically restarts the tunnel if it goes down:
sudo cat > /usr/local/bin/wg-health-check.sh << 'EOF'
#!/bin/bash
STATE_FILE="/tmp/wg-health-state"
TIMESTAMP=$(date '+%Y-%m-%d %H:%M:%S')

if ping -c 1 -W 5 10.0.0.1 > /dev/null 2>&1; then
    # Tunnel is up
    if [ ! -f "$STATE_FILE" ]; then
        logger -t wireguard "Health check started - tunnel healthy at $TIMESTAMP"
    elif [ "$(cat $STATE_FILE)" = "down" ]; then
        logger -t wireguard "Tunnel recovered at $TIMESTAMP"
    fi
    echo "up" > "$STATE_FILE"
else
    # Tunnel is down
    logger -t wireguard "Tunnel down at $TIMESTAMP, restarting..."
    echo "down" > "$STATE_FILE"
    wg-quick down wg0 2>/dev/null || true
    sleep 2
    wg-quick up wg0
fi
EOF

sudo chmod +x /usr/local/bin/wg-health-check.sh
The script logs on first run, when the tunnel goes down, and when it recovers. View the logs with:
# Recent WireGuard health check entries
journalctl -t wireguard --since "24 hours ago"

# Follow live
journalctl -t wireguard -f
Schedule it to run every 5 minutes:
(sudo crontab -l 2>/dev/null; echo "*/5 * * * * /usr/local/bin/wg-health-check.sh") | sudo crontab -Scaling to Multiple Pis
WireGuard handles multiple peers natively. To add a second Pi (or third, fourth…), add another [Peer] block to the GCE config:
[Interface]
Address = 10.0.0.1/24
ListenPort = 51820
PrivateKey = <server-private-key>

[Peer]
# Raspberry Pi 1
PublicKey = <pi1-public-key>
AllowedIPs = 10.0.0.2/32

[Peer]
# Raspberry Pi 2
PublicKey = <pi2-public-key>
AllowedIPs = 10.0.0.3/32
Each Pi gets a unique IP in the 10.0.0.0/24 subnet and generates its own keypair. All Pis can be behind the same home NAT - each initiates its own connection to the GCE endpoint.
For the browser automation system in later posts, this means you can run 2 Pis with 6 dongles each = 12 different exit IPs, with the GCE orchestrator load-balancing between them.
When WireGuard Doesn’t Fit
This approach has real costs:
Manual key exchange. Every peer needs to exchange public keys out-of-band. For two machines, this is trivial. For a fleet, it’s painful. Tailscale’s coordination server solves this - you trade simplicity for their infrastructure dependency.
No automatic NAT traversal. If both machines are behind NAT (no public IP anywhere), WireGuard alone won’t work. You’d need a relay or one machine with port forwarding configured.
Static configuration. Adding or removing peers requires editing config files and restarting. No web UI, no API.
WireGuard works best when:
- You have a small number of machines (2-10)
- At least one has a public IP
- You value reliability over convenience
It’s probably overkill for:
- Large fleets needing dynamic membership
- Situations where all machines are behind NAT
- Teams wanting a management UI
Troubleshooting
No handshake:
- Check GCE firewall allows UDP 51820
- Verify the Endpoint IP is correct in the Pi’s config
- Confirm public keys match on both ends
Handshake works but ping fails:
- Check AllowedIPs are correct
- Verify the Address lines don’t conflict with existing networks
Connection drops after inactivity:
- Ensure PersistentKeepalive is set on the Pi
- Some aggressive NATs need 15-20 seconds instead of 25
What’s Next
The GCE VM can now communicate with the Raspberry Pi as if they were on the same network. In the next post, we’ll set up Playwright on the Pi for headless browser automation, routing requests through multiple LTE connections.