Raspberry Pi Headless SSH Setup: What Changed and How to Fix It
Lost SSH access after reformatting your Pi? Modern Raspberry Pi OS disabled SSH by default. Here is the complete headless setup guide.

The SSH command that worked yesterday stopped working today.
$ ssh atd@raspberrypi.local
ssh: Could not resolve hostname raspberrypi.local: Unknown host
I stared at the terminal. Same Pi. Same network. Same command. But I had reformatted the SD card with the official Raspberry Pi Imager, and suddenly my Pi was invisible.
If you have been running a Pi for a while, you probably set it up years ago when things were different. You SSH in, run your scripts, maybe forget it is even there. Then one day you reformat, expecting everything to work like before, and nothing does.
What Changed
Raspberry Pi OS made security changes that break the old workflow:
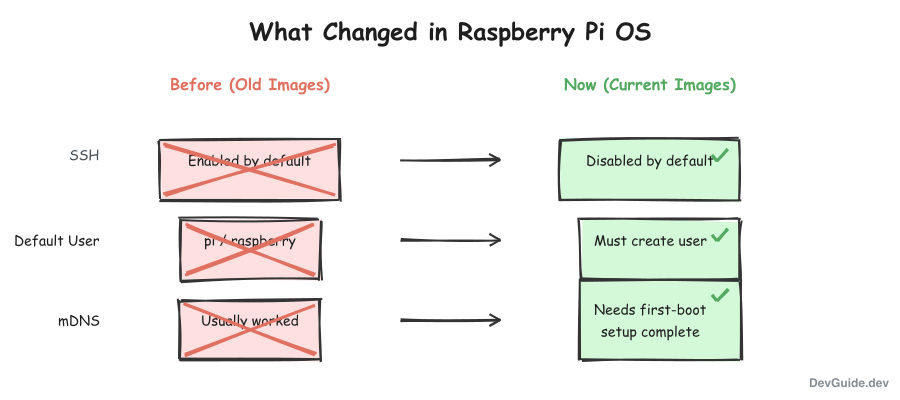
SSH is disabled by default. This was not always the case. Older images shipped with SSH enabled. Now you must explicitly enable it.
The default pi user no longer exists. You cannot just boot and log in with pi/raspberry. The first boot expects you to create a user - which requires a monitor and keyboard if you did not configure it during flashing.
mDNS/Avahi might not work immediately. The raspberrypi.local hostname relies on mDNS (multicast DNS), which needs the avahi-daemon running. On a fresh image, this may not start until initial setup completes.
The Solution: Configure Everything in the Imager
Raspberry Pi Imager v2.0.0 has a built-in customization wizard. No hidden menus - just follow the steps.
Here is the complete headless setup process:
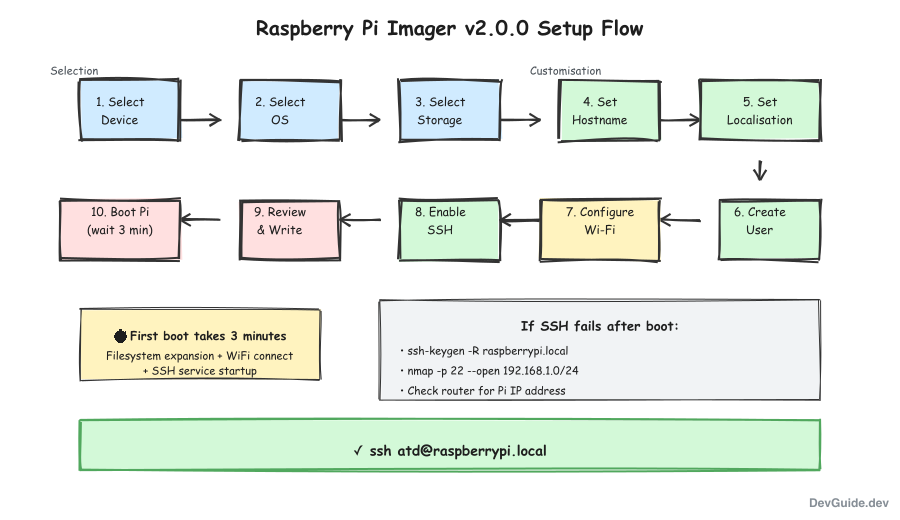
Step 1: Select Device and OS
Download and open Raspberry Pi Imager.
- Device: Select your Pi model (e.g., Raspberry Pi 5)
- OS: This is critical - see the warning below
- Storage: Select your SD card
Important: Use Bookworm, Not Trixie
As of December 2025, the newest Raspberry Pi OS images are based on Debian Trixie. These have WiFi connectivity issues that prevent headless setup from working - the Pi will not connect to WiFi on first boot.
Use the Legacy (Bookworm) image instead:
- Click Raspberry Pi OS (other)
- Select Raspberry Pi OS Lite (Legacy, 64-bit)
- Based on Debian Bookworm
- Released 2025-11-24
- No desktop environment (perfect for headless)
The Bookworm-based image has stable WiFi drivers and works reliably for headless setup.
Click Next to proceed to customization.
Step 2: Set Hostname
The Imager walks you through each setting. First up: hostname.
Enter your preferred name (e.g., raspberrypi, homepi, devpi). This becomes <hostname>.local on your network.
Keep it simple - lowercase letters, numbers, and hyphens only.
Step 3: Set Localisation
Configure your location for correct timezone and keyboard:
- Capital city: Select your nearest city (e.g., New Delhi for India)
- Time zone: Auto-filled based on city (e.g., Asia/Kolkata)
- Keyboard layout: Match your physical keyboard
Step 4: Create Your User
This is the step that catches most people. You must create a user here.
- Username: Enter your desired username (e.g.,
atd) - Password: Enter and confirm a password
Without this, the Pi will boot to a setup wizard that requires a monitor.
Step 5: Configure WiFi
If your Pi does not have Ethernet or you want wireless:
- Select Secure Network (for password-protected WiFi)
- SSID: Enter your network name exactly as it appears (case-sensitive!)
- Password: Enter and confirm your WiFi password
Pro tip: Check your Mac’s current WiFi name to get the exact SSID:
networksetup -getairportnetwork en0
Step 6: Enable SSH (Remote Access)
This is the critical step for headless setup:
- Toggle Enable SSH on
- Choose your authentication method:
- Use password authentication - simpler but less secure
- Use public key authentication - more secure, recommended
For public-key auth, paste your public key. If you do not have one:
# Generate a new SSH key
ssh-keygen -t ed25519 -C "your_email@example.com"

# View the public key to paste into Imager
cat ~/.ssh/id_ed25519.pub
Step 7: Review and Write
The summary screen shows all your customizations:
- Hostname configured
- Localisation configured
- User account configured
- Wi-Fi configured
- SSH enabled
Click Write, confirm you want to erase the SD card, and wait for the write and verification to complete.
Step 8: Boot the Pi
- Insert the SD card into your Pi
- Power it on
- Wait 3 full minutes for first boot to complete
The Pi needs time to:
- Expand the filesystem
- Apply your customizations
- Connect to WiFi
- Start SSH and Avahi services
Finding Your Pi on the Network
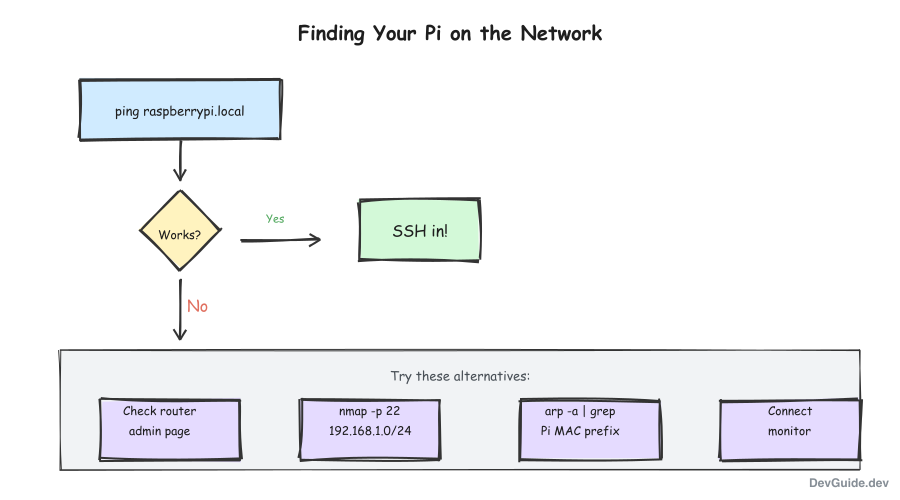
If raspberrypi.local does not resolve immediately, here are your options:
Option 1: Wait and Retry
mDNS can take a minute to propagate:
# Wait 30 seconds, then try
ping raspberrypi.local
Option 2: Check Your Router
Log into your router’s admin panel (usually 192.168.1.1 or 192.168.0.1). Look for connected devices - the Pi should appear with its hostname and IP address.
Option 3: Scan the Network
Use nmap to find devices with SSH running:
# Install nmap if needed
brew install nmap  # macOS
sudo apt install nmap  # Linux

# Scan for SSH on your local subnet
# Replace with your actual subnet
nmap -p 22 --open 192.168.1.0/24
This shows all devices with port 22 open:
Nmap scan report for 192.168.1.105
Host is up (0.0043s latency).

PORT   STATE SERVICE
22/tcp open  ssh
Option 4: Use ARP
Check your ARP table for Raspberry Pi MAC addresses (they start with specific prefixes):
# List all devices your machine knows about
arp -a | grep -E "dc:a6|b8:27|e4:5f|d8:3a"
Raspberry Pi MAC prefixes:
dc:a6:32- Raspberry Pi Tradingb8:27:eb- Raspberry Pi Foundatione4:5f:01- Raspberry Pi Tradingd8:3a:dd- Raspberry Pi Trading
Connecting via SSH
Once you have the IP or hostname:
# Using hostname (if mDNS works)
ssh atd@raspberrypi.local

# Using IP address directly
ssh atd@192.168.1.105
If you get a host key warning:
@@@@@@@@@@@@@@@@@@@@@@@@@@@@@@@@@@@@@@@@@@@@@@@@@@@@@@@@@@@
@    WARNING: REMOTE HOST IDENTIFICATION HAS CHANGED!     @
@@@@@@@@@@@@@@@@@@@@@@@@@@@@@@@@@@@@@@@@@@@@@@@@@@@@@@@@@@@
This is expected after reformatting. The Pi has new host keys. Clear the old entry:
# Remove old host key
ssh-keygen -R raspberrypi.local
ssh-keygen -R 192.168.1.105  # if using IP
Then connect again.
Troubleshooting
Pi Not Appearing on Network (WiFi)
If your Pi does not appear on your router’s connected devices list:
- Check your OS image - The Trixie-based images (December 2025) have WiFi issues. Use the Bookworm (Legacy) image instead.
- Verify SSID - The network name is case-sensitive. Check your Mac’s current WiFi:
networksetup -getairportnetwork en0 - Check password - Re-enter it carefully when reflashing.
- Try Ethernet - Temporarily connect via Ethernet to verify everything else works.
”Connection refused”
SSH is not running. Either:
- The Pi has not finished first-boot setup (wait longer)
- SSH was not enabled in the Imager settings (reflash with correct settings)
“No route to host”
The Pi is not on the network. Check:
- Is the Pi powered on? (look for LED activity)
- Is Ethernet connected, or was WiFi configured correctly?
- Is the Pi on the same network as your computer?
mDNS Not Working
If .local hostnames never resolve, your network might be blocking mDNS (multicast). Some corporate networks and VPNs do this.
Workarounds:
- Use the IP address directly
- Add an entry to
/etc/hosts:echo "192.168.1.105 raspberrypi.local" | sudo tee -a /etc/hosts
Wrong Username
If you cannot remember what username you configured:
- Connect a monitor and keyboard
- Boot the Pi and check the login prompt (it shows the username)
- Or reflash with the correct settings
The Complete Flow
Here is what happens during a successful headless setup:
Quick Reference
| Setting | Location in Imager v2 | Recommended Value |
|---|---|---|
| OS Image | OS selection | Raspberry Pi OS Lite (Legacy, 64-bit) - Bookworm |
| SSH | Customisation > Remote access | Enabled (required) |
| Username/Password | Customisation > User | Set both (required) |
| WiFi | Customisation > Wi-Fi | Your network SSID + password |
| Hostname | Customisation > Hostname | raspberrypi or custom |
| Localisation | Customisation > Localisation | Your timezone |
After First Boot
Once connected, update your system:
sudo apt update && sudo apt upgrade -yAnd verify your hostname is set correctly:
hostname
# Should show: raspberrypi (or whatever you configured)
When This Guide Does Not Apply
This guide assumes:
- You are using the official Raspberry Pi Imager
- You are running Raspberry Pi OS (Debian-based)
- Your network supports mDNS or you can scan for devices
If you are using a third-party image (Ubuntu, DietPi, etc.), the configuration method differs. Check that distribution’s headless setup documentation.
The SSH command that worked yesterday works again today. But now I actually understand why.
This post is part of a series on Raspberry Pi. See also: Keep Your Raspberry Pi Online and Identify Your Raspberry Pi Hardware.