WireGuard Tutorial: A Practical Guide to Modern VPN Setup
Learn WireGuard from scratch - concepts, configuration, common topologies, and practical examples for setting up secure VPN tunnels between Linux machines.

The OpenVPN config file was 87 lines. Cipher suites, TLS auth keys, certificate paths, compression settings, route-nopull directives. I copy-pasted it from a tutorial, changed three values, and prayed.
It didn’t work.
Four hours later - after debugging certificate chains, realizing the server wanted tls-auth but the client config had tls-crypt, and discovering that my firewall was blocking UDP 1194 - I finally got a connection. The tunnel dropped every 20 minutes because of a keep-alive mismatch.
Then I discovered WireGuard. My first working config was 10 lines. It took 5 minutes. It hasn’t dropped in two years.
This is what VPN configuration should feel like.
Why WireGuard?
Simplicity: A WireGuard config file is ~10 lines. An OpenVPN config is often 50+.
Performance: WireGuard runs in the kernel, not userspace. Benchmarks show 3-4x throughput vs OpenVPN.
Security: Modern cryptography only (Curve25519, ChaCha20, Poly1305). No cipher negotiation, no legacy options.
Stealth: Silent when not in use. Doesn’t respond to unauthenticated packets.
Core Concepts
Before configuring anything, understand these five concepts:
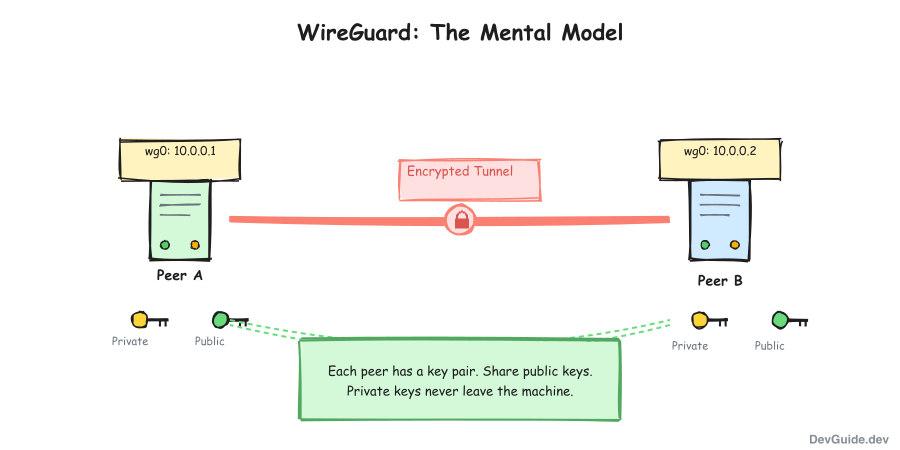
1. Interface
WireGuard creates a virtual network interface (like wg0 - the name comes from the config filename, which we’ll see later). This interface has:
- A private key
- A listening port (optional)
- An IP address within your VPN network
wg0: 10.0.0.1/24 ← This machine's VPN IP2. Peers
A peer is any other machine in your WireGuard network. Each peer has:
- A public key (how you identify them)
- Allowed IPs (what traffic to send to them)
- An endpoint (optional - their public IP:port)
Peer A ←──────────────→ Peer B
       encrypted tunnel
3. Key Pairs
Each machine has a public/private key pair:
- Private key: Secret, never shared, stays on the machine
- Public key: Derived from private key, shared with peers
You give your public key to peers. They give you theirs. That’s how you authenticate each other.
4. AllowedIPs
This is the trickiest concept. AllowedIPs serves two purposes:
Outbound: “What destination IPs should be routed through this peer?” Inbound: “What source IPs is this peer allowed to claim?”
Example:
[Peer]
AllowedIPs = 10.0.0.2/32
This means:
- Send traffic destined for
10.0.0.2through this peer - Accept traffic from this peer only if it claims to be from
10.0.0.2
5. Endpoint
The public IP:port where a peer can be reached.
Endpoint = 203.0.113.5:51820Here’s the key insight: you only need to specify an Endpoint for the peer you’re connecting TO, not for peers connecting to you. If your machine initiates the connection, you need their Endpoint. If they initiate, WireGuard learns their address from incoming packets - no Endpoint needed in your config.
This means at least one side must have a known, reachable address. If both peers are behind NAT, one must have port forwarding set up to be reachable.
Installation
Debian/Ubuntu
sudo apt update
sudo apt install -y wireguard
Fedora/RHEL
sudo dnf install -y wireguard-toolsArch
sudo pacman -S wireguard-toolsmacOS
brew install wireguard-toolsVerify Installation
which wg
# /usr/bin/wg

wg --version
# wireguard-tools v1.0.20210914
Your First WireGuard Tunnel
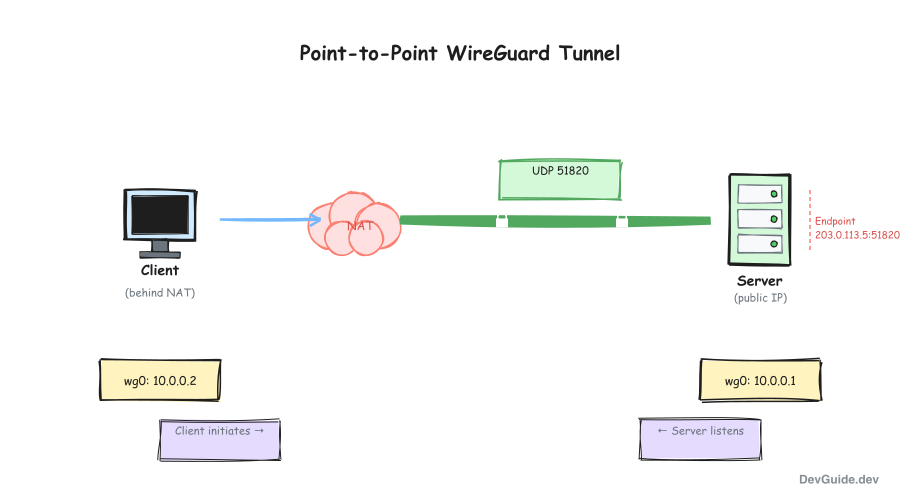
Let’s connect two machines: Server (has public IP) and Client (behind NAT).
This is the most common real-world scenario:
- Server: A VPS or cloud instance with a static public IP address (like
203.0.113.5). Anyone on the internet can reach it directly. - Client: Your laptop or home machine behind a router. It has a private IP (like
192.168.1.50) that the outside world can’t reach directly.
The key insight is that the client can reach the server, but the server can’t initiate contact with the client. This asymmetry shapes everything about how we configure WireGuard.
Step 1: Generate Keys (Both Machines)
On both the server and client:
cd /etc/wireguard
umask 077
wg genkey | tee privatekey | wg pubkey > publickey
Let’s break down what each part does:
cd /etc/wireguard
This changes the current directory to /etc/wireguard.
- This is the standard system directory where WireGuard configuration files and keys are stored on Linux.
- You need appropriate permissions (usually root) to write here.
umask 077
This sets the file creation permission mask for the current shell.
077means:- Owner: full permissions
- Group & others: no permissions
- Result: any files created afterward will default to permissions like
600(read/write only by the owner).
This is important because private keys must not be readable by other users.
wg genkey | tee privatekey | wg pubkey > publickey
This line does most of the work:
wg genkey- Generates a WireGuard private key and outputs it to stdout.| tee privatekey-teewrites the private key to a file calledprivatekeywhile also passing it through the pipe. Because of the earlierumask 077, this file will have secure permissions.| wg pubkey- Takes the private key from stdin and derives the corresponding public key.> publickey- Redirects the public key output into a file namedpublickey.
After running this, you end up with:
/etc/wireguard/privatekey- Your private WireGuard key (owner-only permissions)/etc/wireguard/publickey- The corresponding public key (safe to share with peers)
The private key is never printed to the screen, file permissions are locked down automatically, and both keys are generated in a single clean pipeline.
View the keys:
cat privatekey
# aB3dE5fG7hI9jK1lM3nO5pQ7rS9tU1vW3xY5zA7bC9=

cat publickey
# XyZ9aB7cD5eF3gH1iJ9kL7mN5oP3qR1sT9uV7wX5yZ=
Write down both public keys - you’ll exchange them.
Step 2: Configure Server
Create /etc/wireguard/wg0.conf on the server:
[Interface]
# Server's private key
PrivateKey = <SERVER_PRIVATE_KEY>

# Server's VPN IP address
Address = 10.0.0.1/24

# Port to listen on
ListenPort = 51820

[Peer]
# Client's public key
PublicKey = <CLIENT_PUBLIC_KEY>

# Client's VPN IP (what IPs can this peer use?)
AllowedIPs = 10.0.0.2/32
Replace:
<SERVER_PRIVATE_KEY>- contents of server’sprivatekeyfile<CLIENT_PUBLIC_KEY>- the client’s public key
Notice there’s no Endpoint for the client. The server doesn’t know (or need to know) the client’s IP address ahead of time. Why? Because:
- The client is behind NAT - its public IP might change, and the server can’t reach it directly anyway
- The client will initiate the connection - when it does, the server learns where to send responses
- WireGuard remembers the source address of incoming packets and uses that as the endpoint
This is like a phone call: the server is sitting by a known phone number (public IP + port), waiting. The client dials in. Once connected, both sides can talk - but the server didn’t need to know the client’s number in advance.
Step 3: Configure Client
Create /etc/wireguard/wg0.conf on the client:
[Interface]
# Client's private key
PrivateKey = <CLIENT_PRIVATE_KEY>

# Client's VPN IP address
Address = 10.0.0.2/24

[Peer]
# Server's public key
PublicKey = <SERVER_PUBLIC_KEY>

# Server's public IP and port
Endpoint = <SERVER_PUBLIC_IP>:51820

# Server's VPN IP (route this through the tunnel)
AllowedIPs = 10.0.0.1/32

# Keep connection alive (needed when behind NAT)
PersistentKeepalive = 25
Replace:
<CLIENT_PRIVATE_KEY>- contents of client’sprivatekeyfile<SERVER_PUBLIC_KEY>- the server’s public key<SERVER_PUBLIC_IP>- the server’s public IP (e.g.,203.0.113.5)
The client config has two things the server config didn’t:
Endpoint - The client must know where to find the server. Since the server has a public IP, we specify it here. Without this, the client has no idea where to send packets. The server didn’t need an Endpoint for the client because the client initiates the connection - the server learns the client’s address from incoming packets.
PersistentKeepalive = 25 - This solves a NAT problem. When the client sends a packet through its router, the router creates a temporary mapping: “packets from the internet on this port go to the client.” But routers forget these mappings after a period of inactivity (often 30-60 seconds). If the tunnel goes quiet, the mapping expires, and the server’s responses can no longer reach the client.
PersistentKeepalive = 25 tells WireGuard to send a keepalive packet every 25 seconds, even when there’s no real traffic. This keeps the NAT mapping alive. The server doesn’t need this setting because it’s not behind NAT - it’s directly reachable.
Step 4: Open Firewall on Server
Allow incoming UDP on port 51820:
# UFW
sudo ufw allow 51820/udp

# firewalld
sudo firewall-cmd --permanent --add-port=51820/udp
sudo firewall-cmd --reload

# iptables
sudo iptables -A INPUT -p udp --dport 51820 -j ACCEPT
Step 5: Start WireGuard
wg-quick is a helper script that comes with WireGuard. The core wg command only manages keys and peers - it doesn’t create network interfaces, assign IP addresses, or set up routing. wg-quick handles all of that for you. It reads your config file and does everything needed to bring up a working tunnel: creates the interface, assigns the Address, configures routes based on AllowedIPs, and runs any PostUp/PostDown scripts.
Where does wg0 come from? It’s derived from the config filename. We created /etc/wireguard/wg0.conf, so the interface name is wg0 (the filename without .conf). You could name it anything - wg-home.conf would create interface wg-home, vpn.conf would create interface vpn.
On the server first:
sudo wg-quick up wg0Then on the client:
sudo wg-quick up wg0Step 6: Verify Connection
Check status on either machine:
sudo wg showExpected output (on client):
interface: wg0
  public key: XyZ9aB7cD5eF3gH1iJ9kL7mN5oP3qR1sT9uV7wX5yZ=
  private key: (hidden)
  listening port: 43210

peer: AbC1dE2fG3hI4jK5lM6nO7pQ8rS9tU0vW1xY2zA3bC=
  endpoint: 203.0.113.5:51820
  allowed ips: 10.0.0.1/32
  latest handshake: 5 seconds ago    ← This confirms it's working
  transfer: 1.24 KiB received, 928 B sent
  persistent keepalive: every 25 seconds
“latest handshake” confirms the tunnel is established.
Test connectivity:
# From client
ping -c 4 10.0.0.1

# From server
ping -c 4 10.0.0.2
Enable on Boot
Make WireGuard start automatically. Run this on both machines:
sudo systemctl enable wg-quick@wg0Now wg0 will come up after every reboot.
Server: You almost always want this. The server should be ready to accept connections as soon as it boots - clients expect it to be available.
Client: Optional. Enable it if you want the VPN tunnel to connect automatically on startup. Skip it if you prefer to manually bring the tunnel up only when needed (with sudo wg-quick up wg0).
Common Topologies
Point-to-Point (Two Machines)
What we just set up. Two machines connected directly.
Machine A ←────────→ Machine BUse case: Accessing a home server from a VPS.
Hub and Spoke (Star Topology)
One central server, multiple clients. Clients connect to the hub, not to each other.
        ┌──── Client 1
        │
Hub ────┼──── Client 2
        │
        └──── Client 3
Hub config has multiple [Peer] sections:
[Interface]
PrivateKey = <HUB_PRIVATE>
Address = 10.0.0.1/24
ListenPort = 51820

[Peer]
PublicKey = <CLIENT1_PUBLIC>
AllowedIPs = 10.0.0.2/32

[Peer]
PublicKey = <CLIENT2_PUBLIC>
AllowedIPs = 10.0.0.3/32

[Peer]
PublicKey = <CLIENT3_PUBLIC>
AllowedIPs = 10.0.0.4/32
Each client only needs the hub as a peer.
Use case: Remote access for a team to a central server.
Full Mesh
Every machine connects to every other machine. Complex but allows direct communication between any pair.
    A ──── B
    │╲    ╱│
    │ ╲  ╱ │
    │  ╲╱  │
    │  ╱╲  │
    │ ╱  ╲ │
    │╱    ╲│
    C ──── D
Each machine has N-1 peer sections (where N is total machines).
Use case: Small team needing peer-to-peer access.
Site-to-Site
Connect two networks (not just two machines). Requires IP forwarding and routing.
Network A                           Network B
192.168.1.0/24                      192.168.2.0/24
     │                                   │
     │                                   │
  Gateway A ◄───── WireGuard ─────► Gateway B
  10.0.0.1                          10.0.0.2
Gateway A config:
[Interface]
PrivateKey = <A_PRIVATE>
Address = 10.0.0.1/24
ListenPort = 51820

# Enable IP forwarding
PostUp = sysctl -w net.ipv4.ip_forward=1
PostUp = iptables -A FORWARD -i wg0 -j ACCEPT
PostUp = iptables -t nat -A POSTROUTING -o eth0 -j MASQUERADE
PostDown = iptables -D FORWARD -i wg0 -j ACCEPT
PostDown = iptables -t nat -D POSTROUTING -o eth0 -j MASQUERADE

[Peer]
PublicKey = <B_PUBLIC>
Endpoint = <B_PUBLIC_IP>:51820
AllowedIPs = 10.0.0.2/32, 192.168.2.0/24  # Include remote network
The key is AllowedIPs including the remote network’s CIDR.
Routing All Traffic Through WireGuard
To route all internet traffic through the tunnel (like a traditional VPN):
Client config:
[Peer]
PublicKey = <SERVER_PUBLIC>
Endpoint = <SERVER_IP>:51820
AllowedIPs = 0.0.0.0/0, ::/0    # Route everything
PersistentKeepalive = 25
Server needs NAT enabled:
[Interface]
PrivateKey = <SERVER_PRIVATE>
Address = 10.0.0.1/24
ListenPort = 51820

PostUp = iptables -A FORWARD -i wg0 -j ACCEPT
PostUp = iptables -t nat -A POSTROUTING -o eth0 -j MASQUERADE
PostDown = iptables -D FORWARD -i wg0 -j ACCEPT
PostDown = iptables -t nat -D POSTROUTING -o eth0 -j MASQUERADE

[Peer]
PublicKey = <CLIENT_PUBLIC>
AllowedIPs = 10.0.0.2/32
Note: Replace eth0 with your server’s actual internet-facing interface.
DNS Configuration
When routing all traffic, you also want DNS to go through the tunnel:
[Interface]
PrivateKey = <PRIVATE_KEY>
Address = 10.0.0.2/24
DNS = 1.1.1.1, 8.8.8.8    # Or your preferred DNS
wg-quick will configure the system resolver automatically.
Adding and Removing Peers
Add a Peer Without Restarting
# Generate keys for new peer
wg genkey | tee newpeer_private | wg pubkey > newpeer_public

# Add peer to running interface
sudo wg set wg0 peer $(cat newpeer_public) allowed-ips 10.0.0.5/32
Remove a Peer
sudo wg set wg0 peer <PEER_PUBLIC_KEY> removeSave Running Config to File
sudo wg-quick save wg0This writes the current running config (including dynamically added peers) to /etc/wireguard/wg0.conf.
Debugging
Check Interface Status
sudo wg showLook for:
latest handshake- recent timestamp means connection is alivetransfer- bytes sent/receivedendpoint- where the peer is connecting from
No Handshake?
Possible causes:
- Firewall blocking UDP 51820 - check both sides
- Wrong endpoint - verify the public IP
- Key mismatch - double-check public keys are exchanged correctly
- NAT without keepalive - add
PersistentKeepalive = 25
Handshake Works, But No Ping?
- AllowedIPs misconfigured - must include the peer’s VPN IP
- Firewall blocking ICMP - try
curlinstead ofping - Routing issue - check
ip routeon both sides
View Interface Details
ip addr show wg0
ip route | grep wg0
Debug Logging
For kernel-level debugging:
echo module wireguard +p > /sys/kernel/debug/dynamic_debug/control
dmesg -w | grep wireguard
Turn off when done:
echo module wireguard -p > /sys/kernel/debug/dynamic_debug/controlSecurity Best Practices
Protect Private Keys
chmod 600 /etc/wireguard/wg0.conf
chmod 600 /etc/wireguard/privatekey
Only root should read these files.
Use Unique Keys Per Peer
Don’t reuse keys across machines. Generate fresh key pairs for each device.
Restrict AllowedIPs
Only allow the IPs the peer actually needs:
# Good: specific IP
AllowedIPs = 10.0.0.2/32

# Risky: entire subnet
AllowedIPs = 10.0.0.0/24

# Dangerous: route everything
AllowedIPs = 0.0.0.0/0
Rotate Keys Periodically
WireGuard keys don’t expire. Rotate them annually or when a device is compromised:
- Generate new key pair
- Update configs on both sides
- Restart WireGuard
Preshared Keys (Extra Security)
For post-quantum resistance, add a preshared key:
wg genpsk > preshared.keyAdd to both peer configs:
[Peer]
PublicKey = <PEER_PUBLIC>
PresharedKey = <PRESHARED_KEY>
AllowedIPs = 10.0.0.2/32
Both sides must have the same preshared key.
Quick Reference
Commands
| Action | Command |
|---|---|
| Start interface | sudo wg-quick up wg0 |
| Stop interface | sudo wg-quick down wg0 |
| Show status | sudo wg show |
| Show config | sudo wg showconf wg0 |
| Generate private key | wg genkey |
| Derive public key | wg pubkey < privatekey |
| Generate preshared key | wg genpsk |
| Add peer dynamically | sudo wg set wg0 peer <PUB> allowed-ips <IP> |
| Remove peer | sudo wg set wg0 peer <PUB> remove |
| Enable on boot | sudo systemctl enable wg-quick@wg0 |
Config File Structure
[Interface]
PrivateKey = <this machine's private key>
Address = <this machine's VPN IP>/24
ListenPort = 51820                    # optional, for servers
DNS = 1.1.1.1                         # optional, for clients
PostUp = <command to run after up>    # optional
PostDown = <command to run after down> # optional

[Peer]
PublicKey = <peer's public key>
AllowedIPs = <IPs to route to this peer>
Endpoint = <peer's public IP:port>     # optional if peer connects to us
PersistentKeepalive = 25               # optional, for NAT traversal
PresharedKey = <shared secret>         # optional, extra security
Common AllowedIPs Patterns
| Pattern | Meaning |
|---|---|
10.0.0.2/32 | Only this specific IP |
10.0.0.0/24 | Entire VPN subnet |
192.168.1.0/24 | Remote LAN (site-to-site) |
0.0.0.0/0, ::/0 | All traffic (full tunnel) |
When WireGuard Doesn’t Fit
WireGuard isn’t the answer to every VPN problem. Here’s when you might need something else:
No built-in user authentication. WireGuard authenticates by public key, not username/password. If you need Active Directory integration or RADIUS authentication, you’ll need to layer something on top (like a management tool) or use OpenVPN.
Static IP assignment. Each peer has a fixed IP in the config. There’s no DHCP-style dynamic assignment. For large organizations with hundreds of users, this means more config management.
No TCP fallback. WireGuard is UDP-only. If you’re behind a restrictive corporate firewall that blocks all UDP, WireGuard won’t work. OpenVPN can fall back to TCP 443, masquerading as HTTPS traffic.
Limited obfuscation. WireGuard’s packet format is distinctive. In countries that actively block VPN protocols, it can be detected and blocked. Tools like Shadowsocks or obfsproxy are designed for this use case.
No session persistence. Rebooting a peer requires the other side to re-establish the connection. For most setups with PersistentKeepalive, this happens automatically. But if you need guaranteed sub-second failover, you might need more infrastructure.
WireGuard works best when:
- You control both endpoints
- You have a small-to-medium number of peers (tens, not thousands)
- You value simplicity and performance over enterprise features
- UDP can reach your server
For personal VPNs, homelab connectivity, and small team infrastructure - WireGuard is almost always the right choice.
Summary
WireGuard’s power is in its simplicity:
- Generate keys -
wg genkey | tee privatekey | wg pubkey > publickey - Exchange public keys - never share private keys
- Write configs - ~10 lines per machine
- Start it -
sudo wg-quick up wg0 - Enable on boot -
sudo systemctl enable wg-quick@wg0
The mental model is straightforward: each machine has an interface with a private key, and a list of peers identified by their public keys. AllowedIPs determines both routing and authentication.
Start with a simple two-machine setup, verify it works, then expand to more complex topologies as needed.
Remember that 87-line OpenVPN config? Here’s the WireGuard equivalent:
[Interface]
PrivateKey = <your-key>
Address = 10.0.0.2/24

[Peer]
PublicKey = <server-key>
Endpoint = server.example.com:51820
AllowedIPs = 0.0.0.0/0
PersistentKeepalive = 25
Seven lines. Works on the first try. Doesn’t drop.