Raspberry Pi Based Dongle Powered Mobile Proxy Hub
Learn how to set up a dongle-powered mobile proxy hub for testing and development.

Raspberry Pi Based Dongle Powered Mobile Proxy Hub
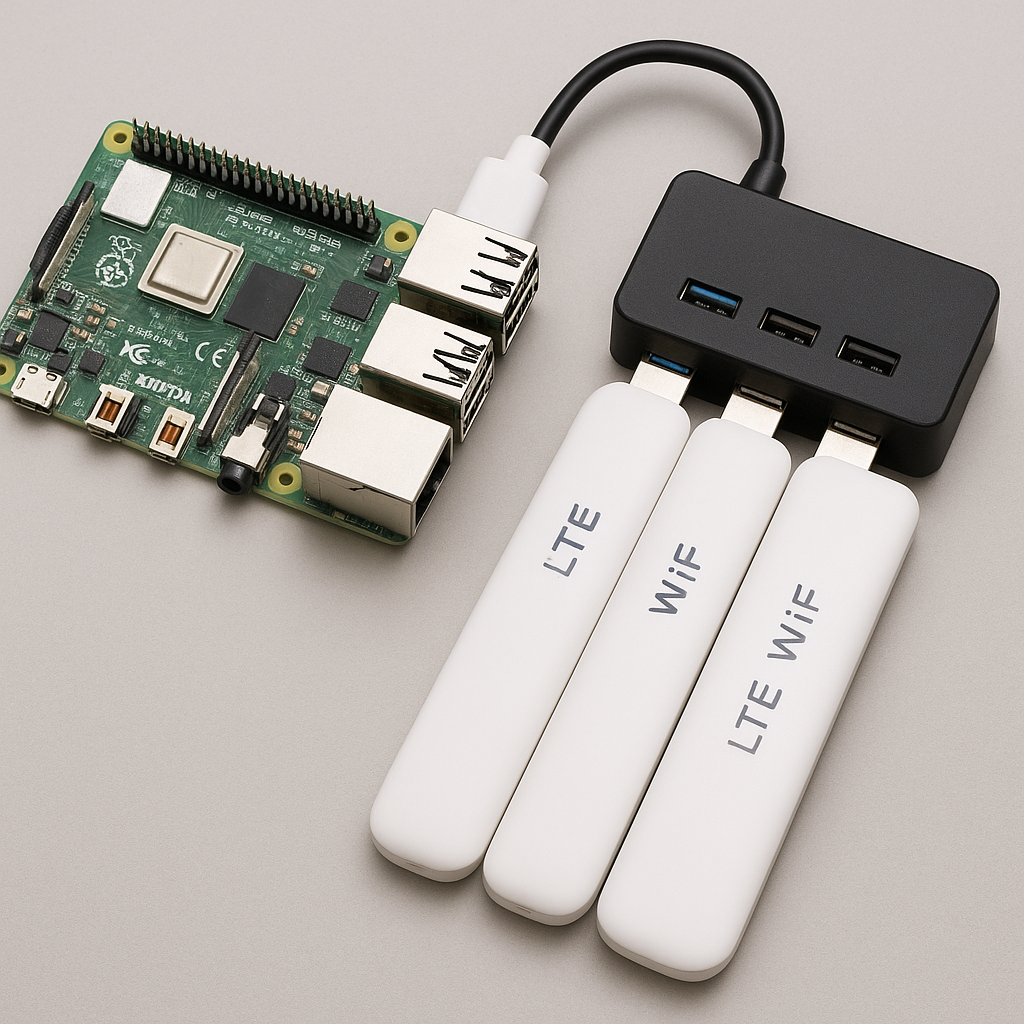
A Raspberry Pi based dongle powered mobile proxy hub is a versatile solution for developers and testers who need to simulate mobile network conditions. This setup allows us to connect multiple mobile dongles to a single hub, enabling us to route traffic through various mobile networks.
The setup we are aiming for can turn each LTE dongle into a separate outbound IP proxy, letting us route traffic through each independently.
✅ High-Level Goals
Use a Raspberry Pi to manage multiple LTE dongles.
Assign each dongle its own IP.
Run a proxy server (like 3proxy, tinyproxy, or squid) for each interface.
Control outbound traffic routing through each LTE connection separately.
🧰 Hardware Requirements
-
Raspberry Pi 4 (preferred): Stronger CPU, multiple USB ports.
-
Powered USB hub: Required to supply sufficient current to all dongles.
-
3x LTE WiFi USB dongles: Confirm that each is recognized by RPi as a modem/network interface.
-
MicroSD Card: With Raspbian (Lite is fine).
-
Optional: Heat sink/fan for Raspberry Pi.
Known Hardware to work
- TP-Link Powered USB Hub with 7 Data Smart Charging USB 3.0 Ports, Compatible with Windows, Mac OS X and Linux Systems, 5V/1.5A Power Output (UH700)
- AmazonBasics 4G LTE WiFi USB Dongle Stick with All SIM Support | Plug & Play Data Card with up to 150Mbps Data Speed, Hotspot for 10 People, Premium QUALCOMM Chipset, Single_Band, Black
Helpful commands
To check connected USB devices
nmcli device status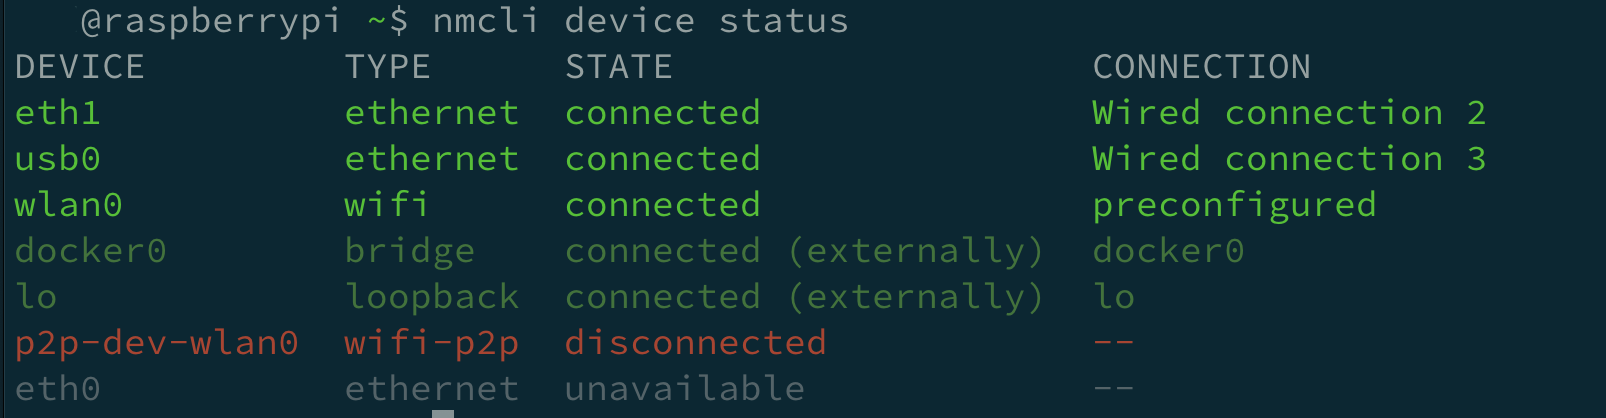
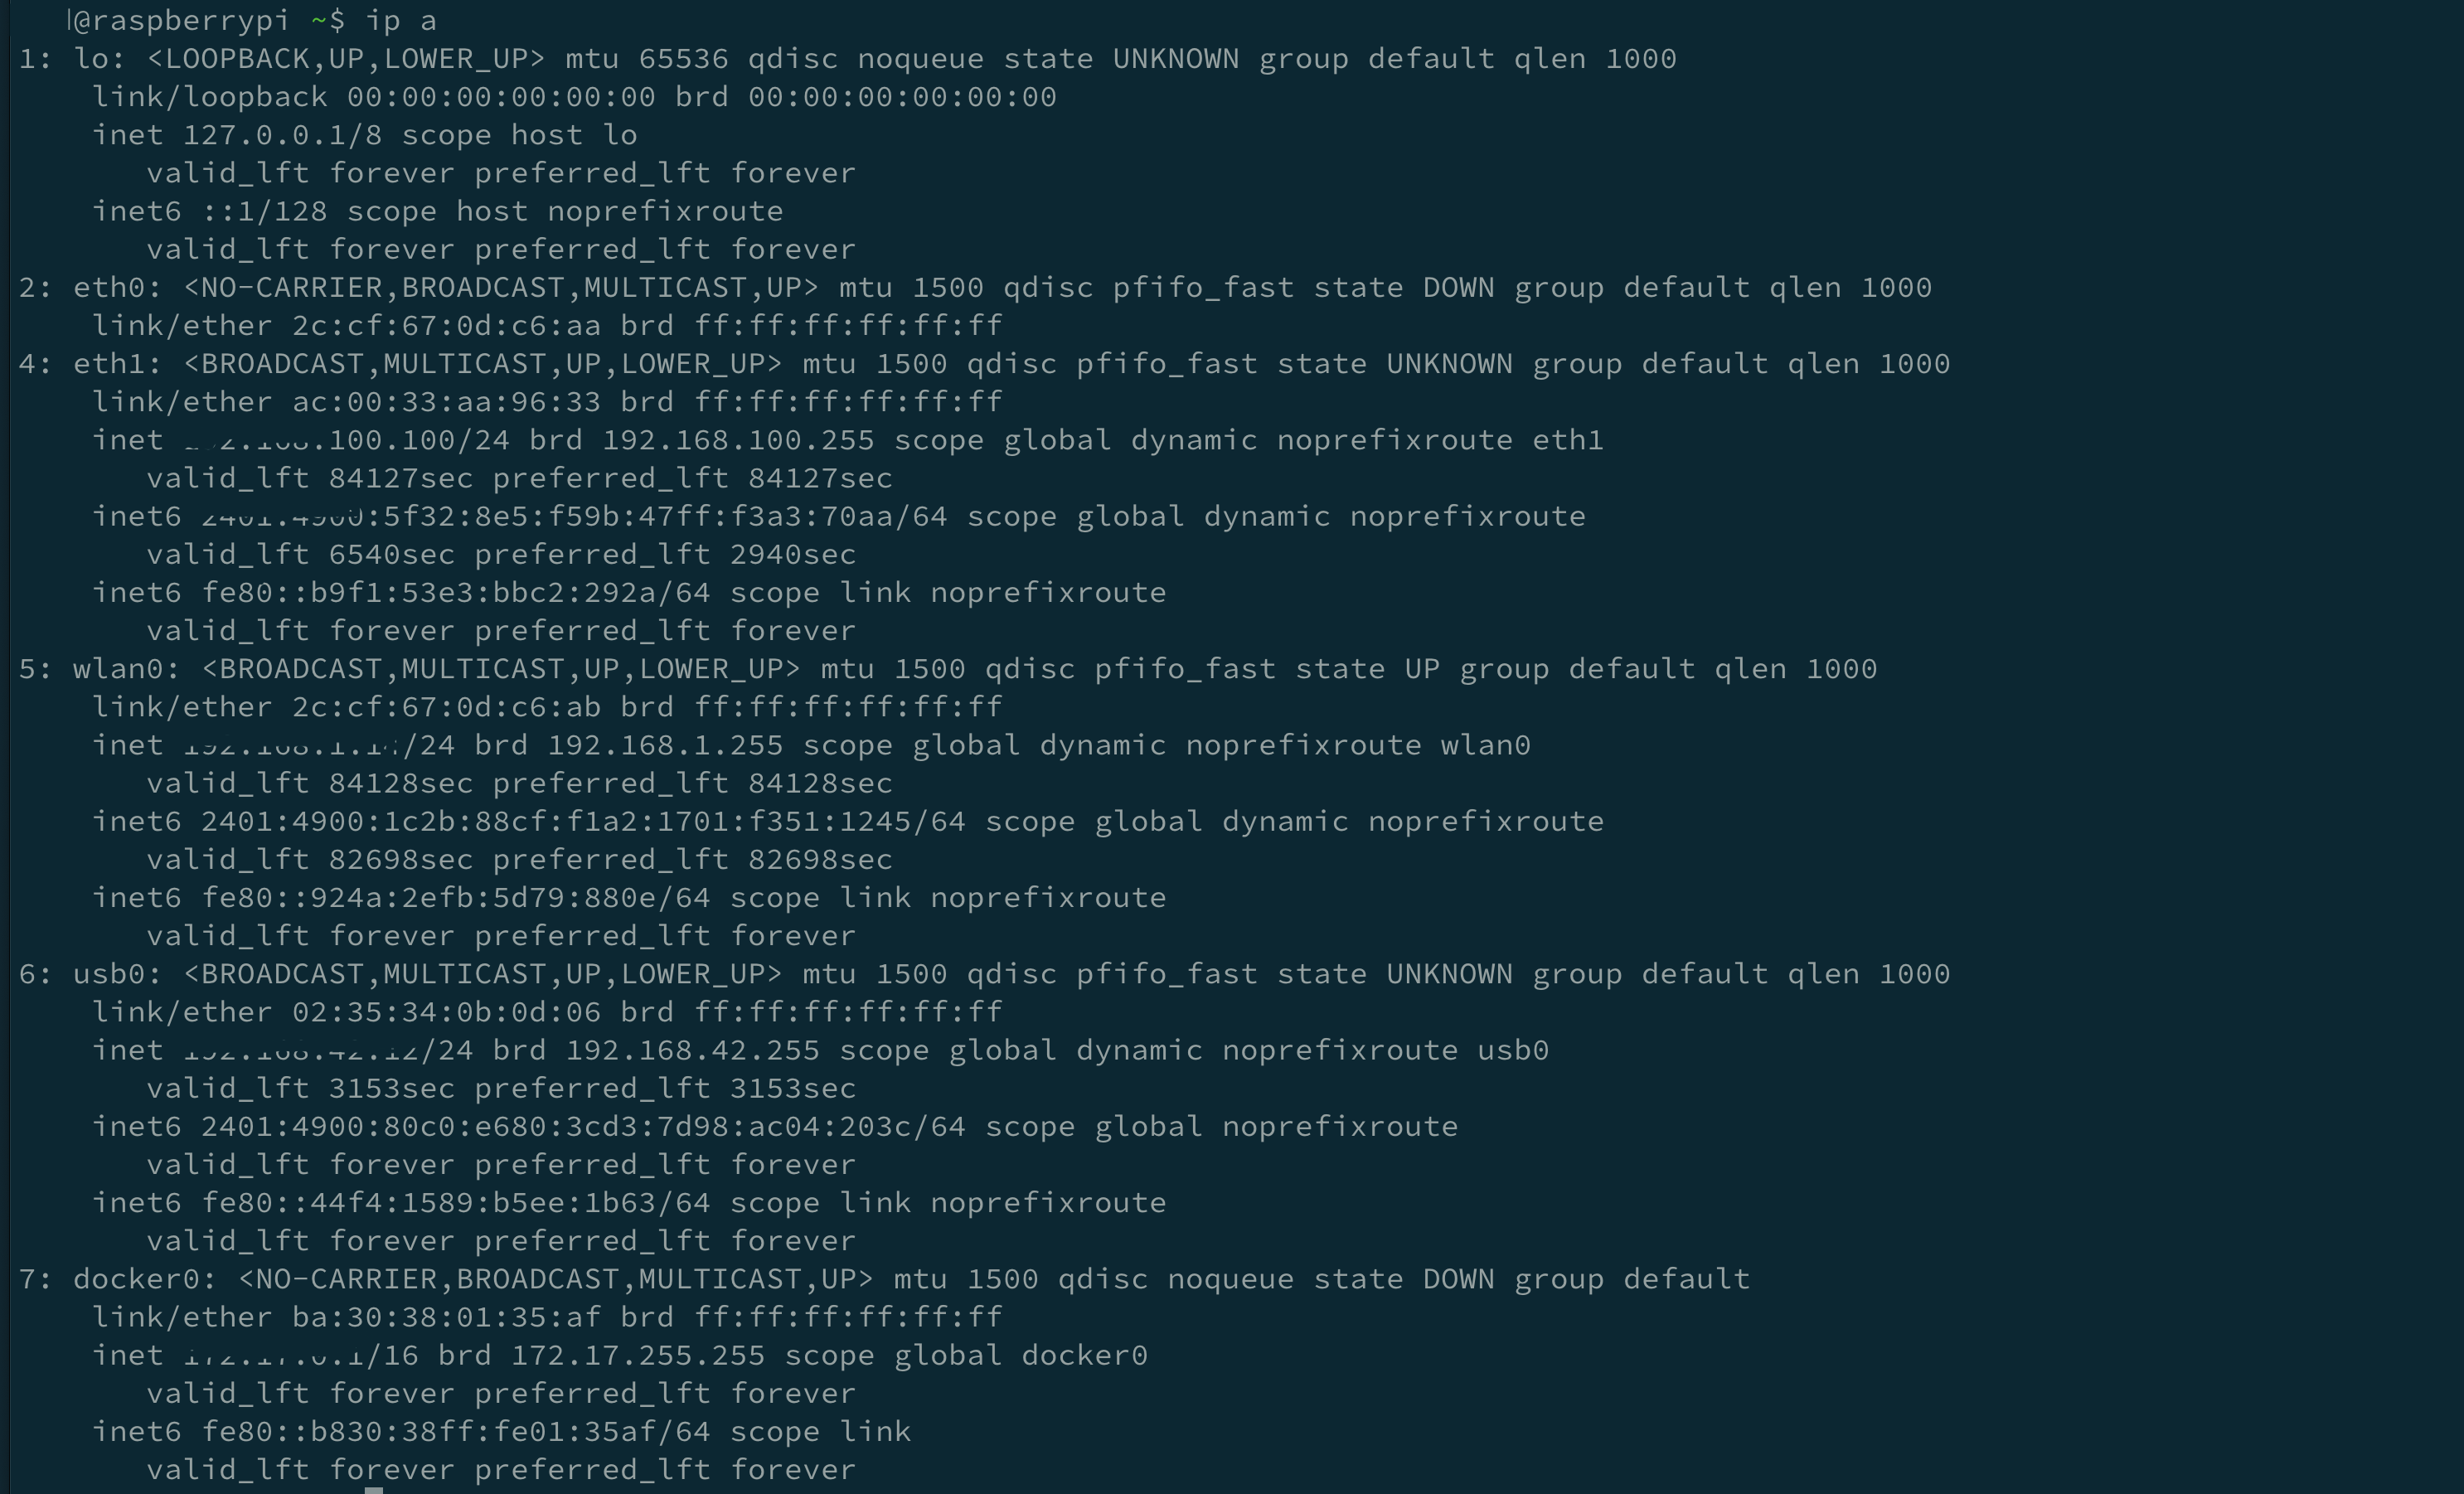
To check network interfaces
ip aYou should see interfaces like usb0, usb1, etc. for each dongle.
To list all network interfaces
ls /sys/class/net/
To check the IP address assigned to a specific interface
curl -s --interface usb0 http://ip-api.com/json/ | python -m json.tool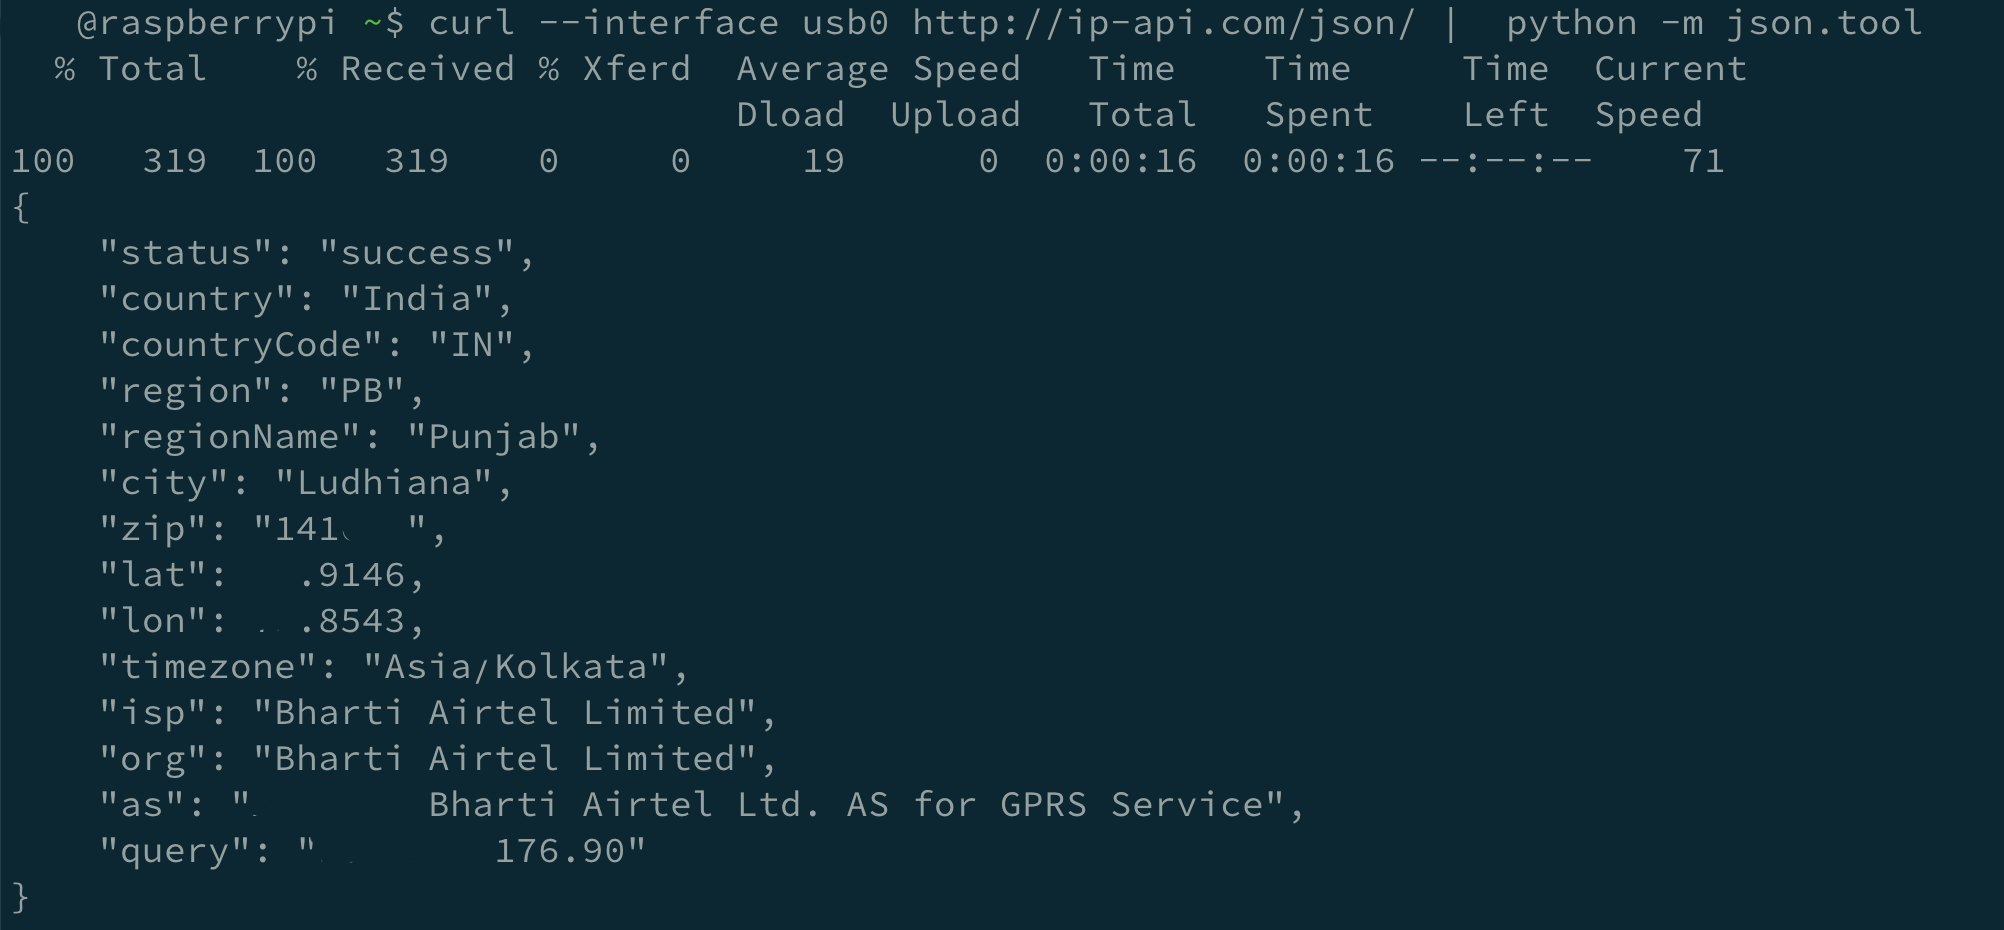
curl -s --interface eth1 http://ip-api.com/json/ | python -m json.tool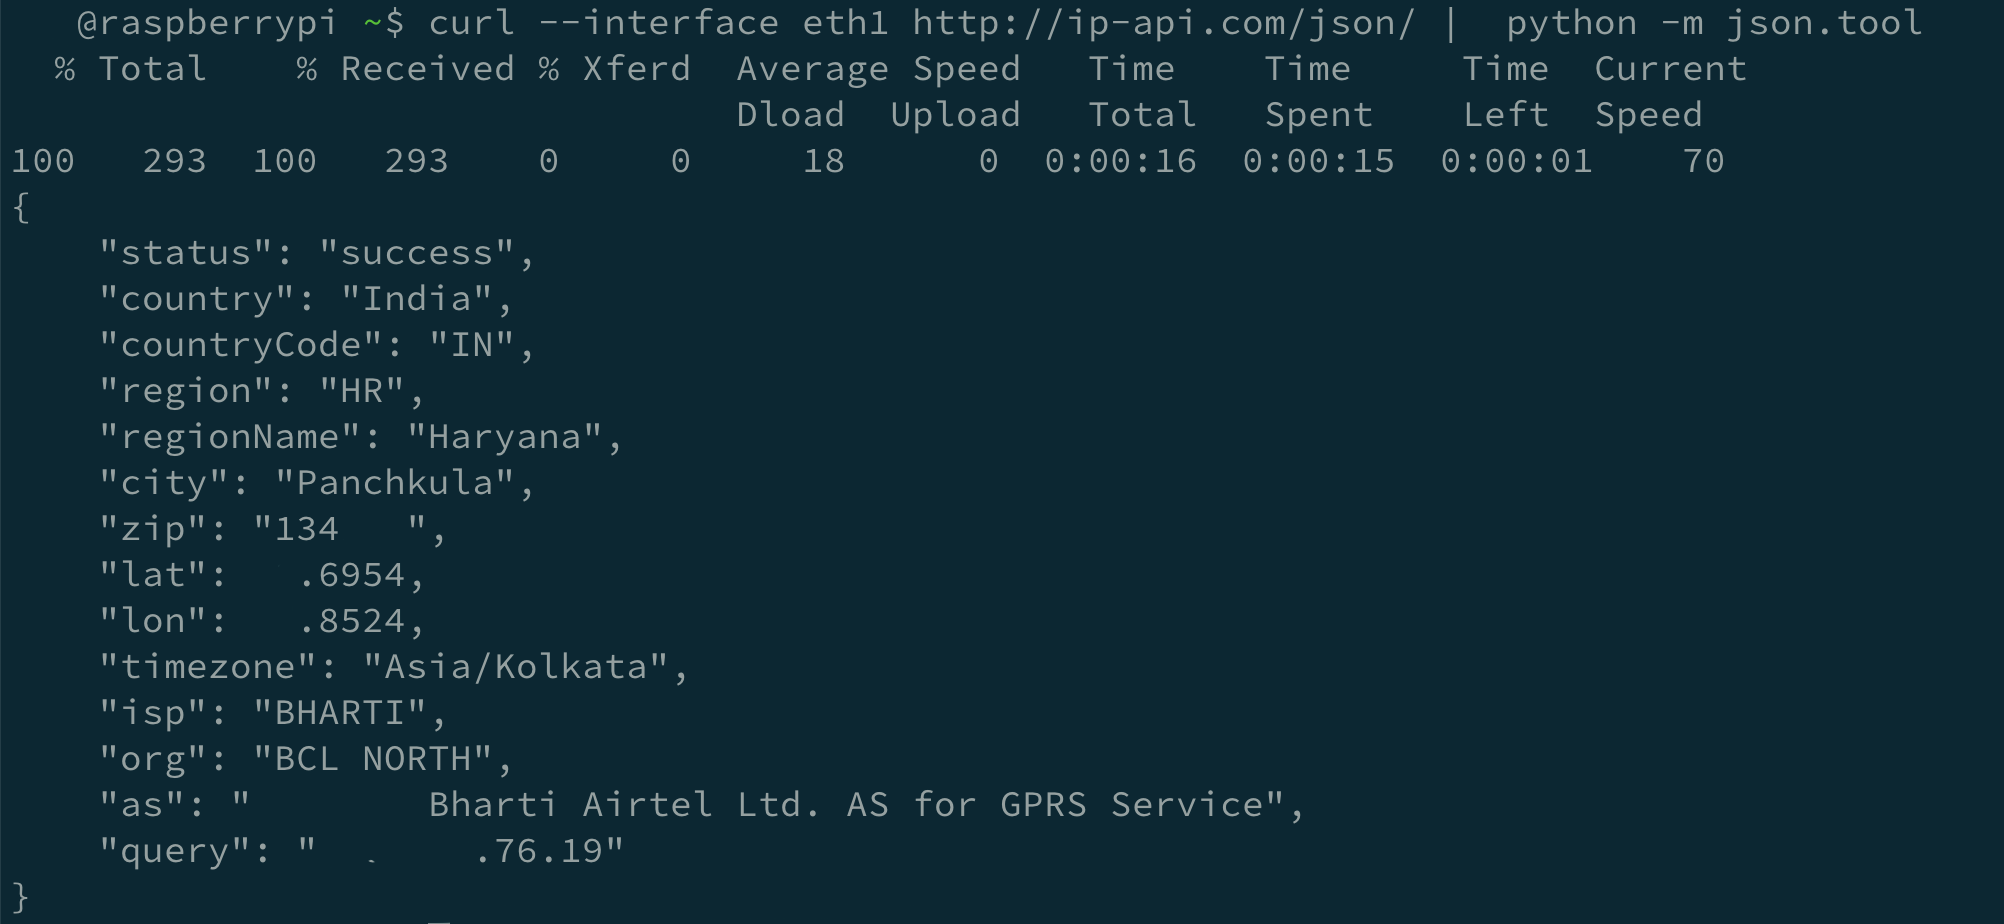
To check logs of a specific Docker container
sudo docker logs proxy1To login to Raspberry Pi without password from your Mac
If you don’t want to enter the password each time:
Generate a key on your Mac (if you don’t have one):
ssh-keygenCopy your public key to the Pi:
ssh-copy-id xyz@raspberrypi.local🛠️ Step-by-Step Setup
1. Initial Raspberry Pi Setup
-
Install latest Raspberry Pi OS Lite.
-
SSH into Pi or use HDMI+keyboard.
2. Install Required Packages
sudo apt update && sudo apt install usb-modeswitch ppp wvdial screen net-tools iproute2 socat dnsmasq3. Detect LTE Dongles
- Plug in dongles via USB hub.
Run:
lsusb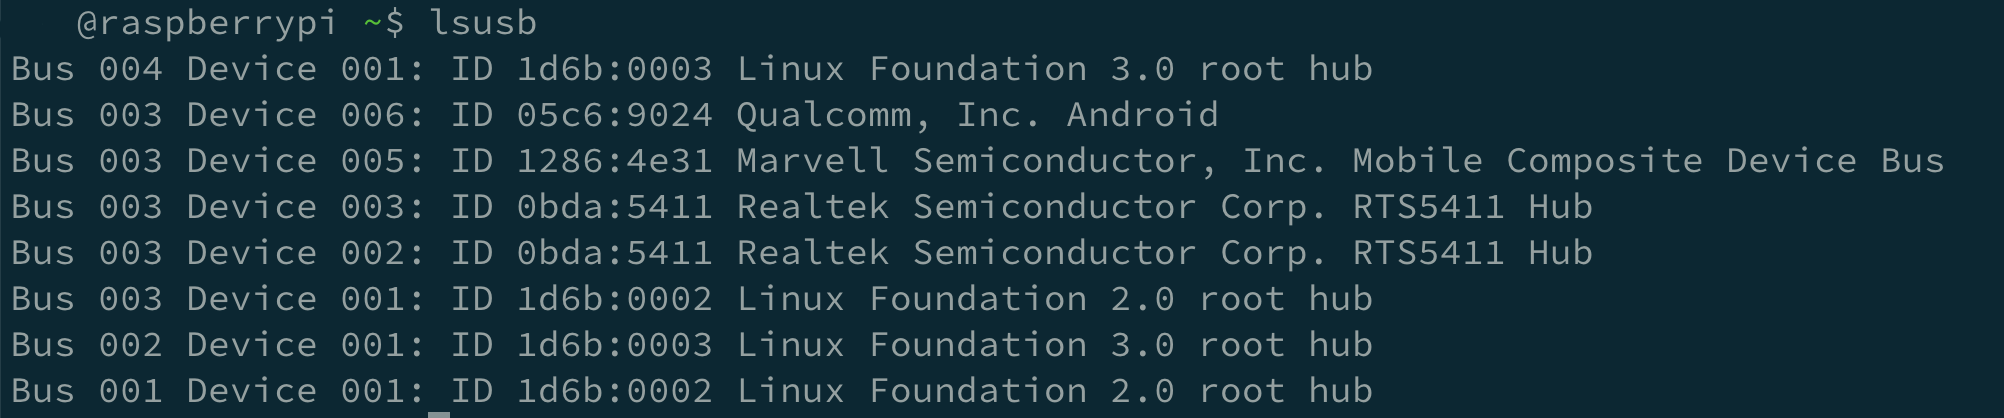
- You should see all 3 devices listed.
4. Switch USB Mode (if required)
Some LTE dongles start in USB storage mode. Use usb_modeswitch to flip them into modem mode.
Check with:
dmesg | grep ttyor
dmesg | grep -i 'usb\|ttyUSB\|ttyACM\|cdc\|option'You should see /dev/ttyUSB0, /dev/ttyUSB1, etc.
Check for IP Address
Assuming the first dongle is recognized as usb0, you can check its IP address with:
ip addr show usb0
5: usb0: <BROADCAST,MULTICAST,UP,LOWER_UP> mtu 1500 qdisc pfifo_fast state UNKNOWN group default qlen 1000
    link/ether 02:35:34:0b:0d:06 brd ff:ff:ff:ff:ff:ff
    inet 192.168.42.12/24 brd 192.168.42.255 scope global dynamic noprefixroute usb0
       valid_lft 2189sec preferred_lft 2189sec
    inet6 2401:4900:420f:2a2e:8c63:bc8f:421a:3933/64 scope global noprefixroute
       valid_lft forever preferred_lft forever
    inet6 fe80::1ba:de8e:179c:96a/64 scope link noprefixroute
       valid_lft forever preferred_lft forever
To test internet access through usb0
ping -c 4 8.8.8.8 -I usb0And if you want to check DNS resolution:
ping -c 4 google.com -I usb0To check the internet address assigned to the dongle, you can use:
curl --interface usb0 https://ifconfig.meor
curl --interface usb0 https://ipinfo.io/ipTo display information about network interfaces on a system
ip link show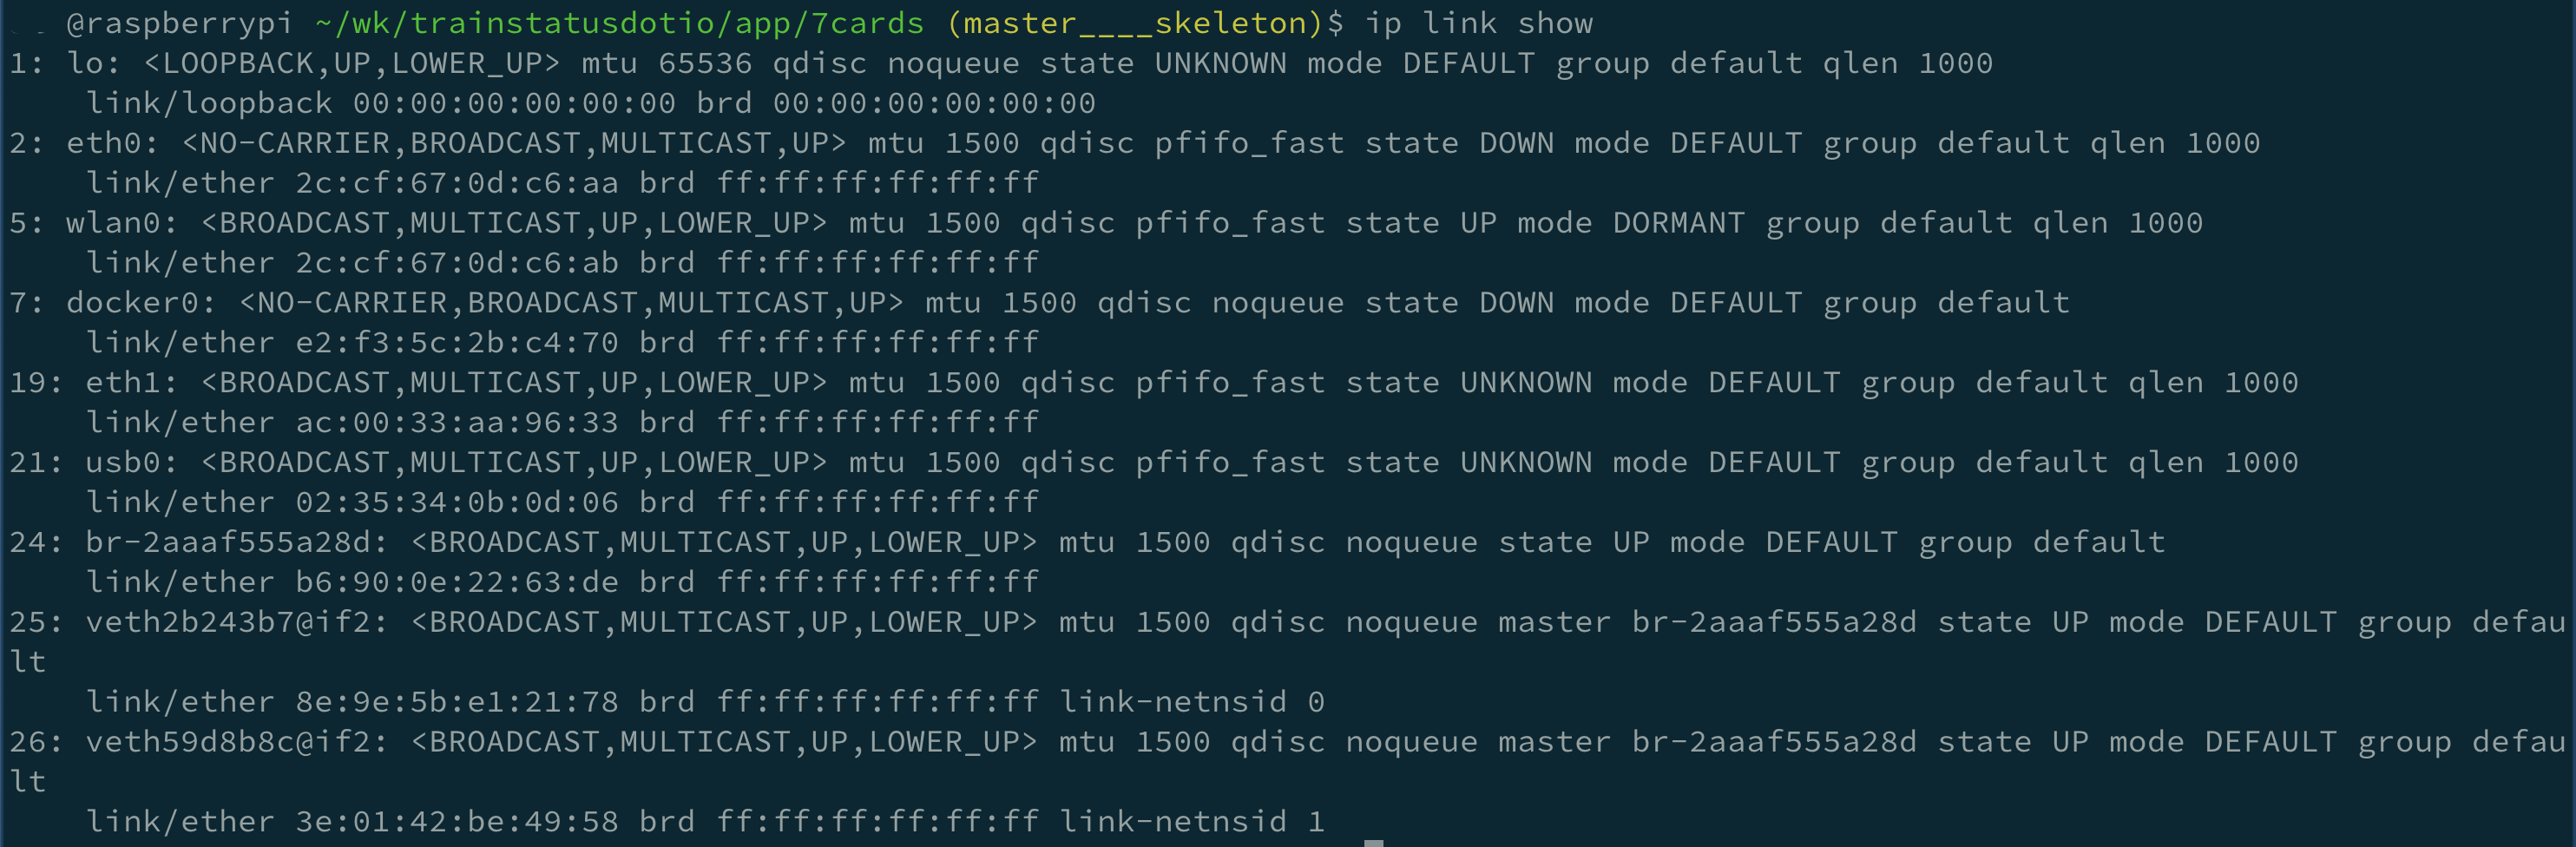
Is the proxy listening on port 8001?
SSH into your Pi and run:
sudo netstat -tulnp | grep 8001
# or
sudo lsof -i -P -n | grep LISTEN
You should see something like:
tinyproxy LISTEN 0.0.0.0:8001Enter into proxy container shell
sudo docker exec -it proxy1 /bin/bashInstall Docker on Raspberry Pi
# Add Docker's official GPG key:
sudo apt-get update
sudo apt-get install ca-certificates curl
sudo install -m 0755 -d /etc/apt/keyrings
sudo curl -fsSL https://download.docker.com/linux/debian/gpg -o /etc/apt/keyrings/docker.asc
sudo chmod a+r /etc/apt/keyrings/docker.asc

# Add the repository to Apt sources:
echo \
  "deb [arch=$(dpkg --print-architecture) signed-by=/etc/apt/keyrings/docker.asc] https://download.docker.com/linux/debian \
  bookworm stable" | \
  sudo tee /etc/apt/sources.list.d/docker.list > /dev/null
sudo apt-get update
sudo apt-get install docker-ce docker-ce-cli containerd.io docker-buildx-plugin docker-compose-plugin
sudo docker run hello-world
Now to turn your Raspberry Pi with 3 USB WiFi dongles into a mobile proxy hub, you’ll need to:
-
Assign each WiFi dongle to a separate Docker container.
-
Set up each container as a proxy (e.g., with Squid or Tinyproxy).
-
Use
hostapd,wpa_supplicant, ornmclito connect each dongle to a different WiFi network (or reconnect periodically to rotate IPs). -
Use
iptables/iproute2to route traffic from each container through its dedicated WiFi dongle.
✅ Requirements
-
Raspberry Pi (Linux OS)
-
Python 3.x
-
Docker
-
3 WiFi dongles (verified to work)
-
sudo privileges
⚙️ STEP 1: Identify Interfaces
ip link showAssume your interfaces are:
wlan0
wlan1
wlan2
Rename them for clarity:
sudo ip link set wlan0 down
sudo ip link set wlan0 name wifi0
sudo ip link set wlan1 down
sudo ip link set wlan1 name wifi1
sudo ip link set wlan2 down
sudo ip link set wlan2 name wifi2
🐳 STEP 2: Docker Network Isolation via Custom Network Namespaces
You’ll isolate each container to use only one WiFi dongle.
🧰 Python Script to Automate Everything Here’s the complete working script:
start_proxies.py
import os
import subprocess
import time

INTERFACES = ['wifi0', 'wifi1', 'wifi2']
PROXY_PORTS = [3001, 3002, 3003]
DOCKER_IMAGES = ['tinyproxy:latest'] * 3
CONTAINER_NAMES = ['proxy1', 'proxy2', 'proxy3']

def run(cmd):
    print(f'Running: {cmd}')
    result = subprocess.run(cmd, shell=True, check=True, stdout=subprocess.PIPE, stderr=subprocess.PIPE)
    return result.stdout.decode()

def create_netns_bridge(interface, container_name):
    pid = run(f"docker inspect -f '{{{{.State.Pid}}}}' {container_name}").strip()
    run(f"mkdir -p /var/run/netns")
    run(f"ln -sf /proc/{pid}/ns/net /var/run/netns/{container_name}")
    run(f"ip link set {interface} netns {container_name}")
    run(f"ip netns exec {container_name} dhclient {interface}")

def setup_container(index):
    container = CONTAINER_NAMES[index]
    port = PROXY_PORTS[index]
    iface = INTERFACES[index]

    # Start Docker container
    run(f"docker run -d --rm --name {container} --network none -p {port}:8888 {DOCKER_IMAGES[index]}")

    time.sleep(3)  # Wait for container startup

    # Attach interface
    create_netns_bridge(iface, container)

def setup_all():
    for i in range(3):
        setup_container(i)

if __name__ == "__main__":
    setup_all()
🐋 Dockerfile for Tinyproxy
Make a custom image for Tinyproxy:
Dockerfile
FROM debian:bullseye-slim

RUN apt update && \
 apt install -y tinyproxy && \
 sed -i 's/^Allow 127.0.0.1/#Allow 127.0.0.1/' /etc/tinyproxy/tinyproxy.conf && \
 sed -i 's/^#Allow 192.168.0.0/Allow 0.0.0.0/' /etc/tinyproxy/tinyproxy.conf && \
 sed -i 's/^Port 8888/Port 8888/' /etc/tinyproxy/tinyproxy.conf && \
 sed -i 's/^#DisableViaHeader/DisableViaHeader/' /etc/tinyproxy/tinyproxy.conf && \
 sed -i 's/^#ConnectPort 443/ConnectPort 443/' /etc/tinyproxy/tinyproxy.conf && \
 echo "DisableViaHeader Yes" >> /etc/tinyproxy/tinyproxy.conf

EXPOSE 8888

CMD ["tinyproxy", "-d"]
Build it:
docker build -t tinyproxy .🐳 STEP 3: Run the Python Script
Make sure your script is executable:
chmod +x start_proxies.pyRun the script:
python3 start_proxies.py🔁 Optional: IP Rotation
Add a cron job or script to periodically reconnect WiFi dongles using nmcli or wpa_cli.
nmcli dev disconnect iface wifi0 && sleep 2 && nmcli dev connect iface wifi0Or in Python:
import subprocess
def rotate_ip(interface):
    subprocess.run(f"nmcli device disconnect {interface}", shell=True)
    time.sleep(3)
    subprocess.run(f"nmcli device connect {interface}", shell=True)
✅ Final Test
On another machine or curl test:
curl -x http://<raspberry_ip>:3001 http://ip-api.com/json/
curl -x http://<raspberry_ip>:3002 http://ip-api.com/json/
curl -x http://<raspberry_ip>:3003 http://ip-api.com/json/
Each should show a different public IP if each dongle connects to a unique mobile hotspot or network.
Now you can create a .service file to run your mobile proxy setup script at boot on your Raspberry Pi.
✅ Assumptions Your Python setup script is saved at:
/home/pi/mobile_proxy/start_proxies.pyYou are using Python 3 installed at /usr/bin/python3.
🔧 Step 1: Make Your Script Executable
chmod +x /home/pi/mobile_proxy/start_proxies.py🔧 Step 2: Create the Systemd Service File
Create the following file:
sudo nano /etc/systemd/system/mobile-proxy.servicePaste this:
[Unit]
Description=Mobile Proxy Hub Starter
After=network-online.target docker.service
Wants=network-online.target

[Service]
Type=simple
User=pi
ExecStart=/usr/bin/python3 /home/pi/mobile_proxy/start_proxies.py
Restart=on-failure
RestartSec=10
Environment=PYTHONUNBUFFERED=1

[Install]
WantedBy=multi-user.target
🔧 Step 3: Enable and Start the Service
sudo systemctl daemon-reexec
sudo systemctl daemon-reload
sudo systemctl enable mobile-proxy.service
sudo systemctl start mobile-proxy.service
📋 Status Check
To confirm it’s working:
sudo systemctl status mobile-proxy.serviceTo view logs:
journalctl -u mobile-proxy.service -fPotential improvement: We can wait until WiFi interfaces are confirmed up before running, we can integrate a pre-check or ExecStartPre step. Let me know if you’d like that enhancement.
Here’s the improved .service file for your mobile proxy hub that:
Waits until all required WiFi interfaces are available before running.
Uses ExecStartPre to run a custom shell script that checks for interface readiness.
Still ensures Docker is started first (After=docker.service).
✅ Step 1: Create Interface Check Script
Create this helper script at:
sudo nano /home/pi/mobile_proxy/wait_for_interfaces.shPaste this:
#!/bin/bash

# List of required WiFi interfaces
REQUIRED_INTERFACES=("wifi0" "wifi1" "wifi2")

TIMEOUT=60
INTERVAL=2
ELAPSED=0

echo "Checking for interfaces: ${REQUIRED_INTERFACES[*]}"

while [ $ELAPSED -lt $TIMEOUT ]; do
    ALL_PRESENT=true
    for iface in "${REQUIRED_INTERFACES[@]}"; do
        if ! ip link show "$iface" &> /dev/null; then
            echo "Missing interface: $iface"
            ALL_PRESENT=false
            break
        fi
    done

    if [ "$ALL_PRESENT" = true ]; then
        echo "All required interfaces are present."
        exit 0
    fi

    sleep $INTERVAL
    ELAPSED=$((ELAPSED + INTERVAL))
done

echo "Timeout waiting for interfaces."
exit 1
Make it executable:
chmod +x /home/pi/mobile_proxy/wait_for_interfaces.sh🔧 Step 2: Update the Systemd Service
Edit or create:
sudo nano /etc/systemd/system/mobile-proxy.servicePaste this improved version:
[Unit]
Description=Mobile Proxy Hub Starter with Interface Check
After=network-online.target docker.service
Wants=network-online.target

[Service]
Type=simple
User=pi
ExecStartPre=/home/pi/mobile_proxy/wait_for_interfaces.sh
ExecStart=/usr/bin/python3 /home/pi/mobile_proxy/start_proxies.py
Restart=on-failure
RestartSec=10
Environment=PYTHONUNBUFFERED=1

[Install]
WantedBy=multi-user.target
✅ Step 3: Reload and Enable the Service
sudo systemctl daemon-reexec
sudo systemctl daemon-reload
sudo systemctl enable mobile-proxy.service
sudo systemctl start mobile-proxy.service
📋 Logs & Debugging
To confirm it’s working:
sudo systemctl status mobile-proxy.serviceFor logs:
journalctl -u mobile-proxy.service -fThis setup ensures your script won’t run prematurely before the interfaces are up, improving reliability significantly. Would you like to add logging to file or email alerts on failure next?